
Preview: new in the next FireCAD release, planned for December 1, and in the beta available now.
Overview
The Connected Device List in the Circuits palette shows the active circuit as a tree: the origin at the top, the trunk devices under it, and each branch nested under the device it taps off. In this release you can change the wiring order and the branches right in the list, and pin a branch to the number on your drawings.
Nothing is changed until you click Apply Changes. Until then, edited rows are marked and a banner shows how many changes are pending.
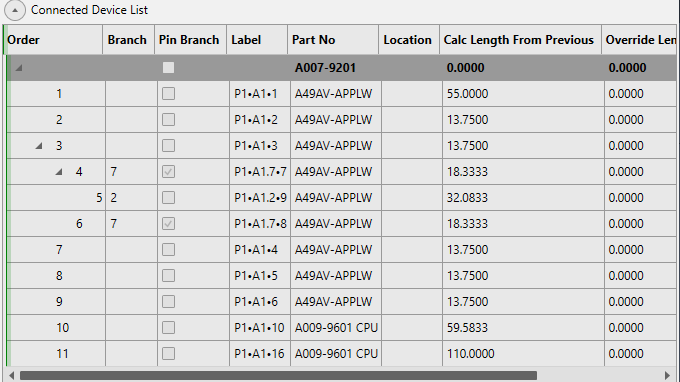
Columns
| Column | What it shows |
|---|---|
| Order | The device's position in the wiring order |
| Branch | The branch number. Blank for the origin and the trunk |
| Pin Branch | Ticked when the branch keeps a number you set |
| Label | The device label, including its address |
Reordering Devices
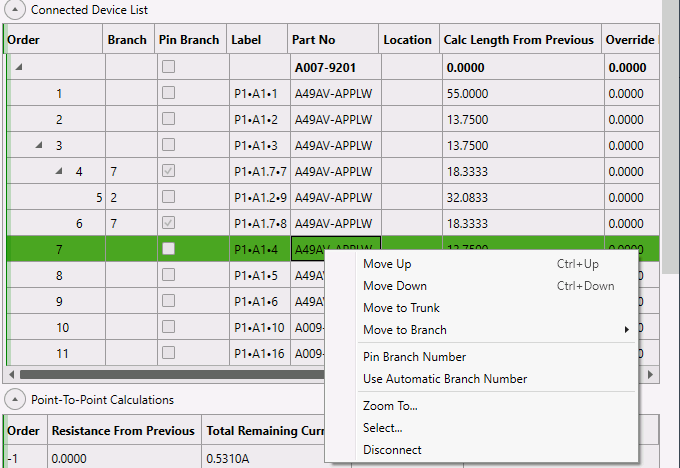
Select a device in the list, then use any of these:
| Action | How |
|---|---|
| Move the device up or down among its neighbors | Right-click > Move Up or Move Down, or press Ctrl+Up / Ctrl+Down |
| Move a branch device back onto the trunk | Right-click > Move to Trunk |
| Move the device onto another device's branch | Right-click > Move to Branch, then choose the device from the list |
| Move it anywhere | Drag the row onto another row |
Then click Apply Changes to save the new order and refresh the labels, or Reset to discard everything that is pending.
A device can't be moved under itself or under one of its own branch devices, and the origin always stays at the top.
Branch Numbers
Branch numbers are normally assigned automatically. To match the numbering on your drawings or a manufacturer's calculation sheet, pin a branch to a number:
- Select a device on the branch
- Type the number you want in its Branch cell. The whole branch takes the number and Pin Branch is ticked. To keep the number the branch has now, tick Pin Branch or right-click > Pin Branch Number instead
- Click Apply Changes
To return a branch to automatic numbering, clear its Branch cell or right-click > Use Automatic Branch Number, then click Apply Changes.
How numbering works:
- A pinned branch always keeps its number, even when other branches are added, moved or removed
- Two branches off the same device can't share a number, because they would become one branch. FireCAD refuses the pin with a message saying the number is already pinned on another branch off that device. Branches off different devices may share a number
- An automatic branch never takes a number another branch on the circuit uses. New branches take the lowest free number, not the next number after the highest
- A device you drag into a branch joins that branch, with its number and pin. A device you drag on its own under a device starts a new, automatic branch
- Pin a branch after you apply a move: if the branch has a move pending, FireCAD asks you to apply it first
Tips
- Branch, Relocate Branch and Remove Branch at the top of the palette still create and change branches by picking devices on the drawing
- Pinned branch numbers are kept when you save, close and reopen the project, and when you validate or refresh labels
Related Commands
FireCAD is the industry-leading AutoCAD add-in for fire alarm system design — from circuit layout to wire routing to code-compliant reports.
Learn more and get started at getfirecad.com →
Inspect Point Integration — Fire alarm system device lists and bill of materials can be pushed directly from FireCAD into Inspect Point, eliminating manual data entry and ensuring every device is ready for inspection scheduling and ongoing asset management.
Learn more here →